
1 Open Strings, Basic Rhythms & the 4/4 Time Signature
Introduction
In this unit you will learn three notes, six rhythms and the most common time signature. Every unit in this series consists of two sections. The first section is theoretical. You will learn to recognize and understand the symbols used in music notation, especially as they relate to the guitar. The second section is practical. You will pluck rhythms and play duets with a recorded guitar part. Why duets? Duets inspire you to continue playing, or keep going, if you make a mistake. According to many studies, as well as my experience as a musician and educator, this method is the most efficient and fun way to become a great sight-reader. Let’s get started!
Notations
Basic Symbols
The Staff
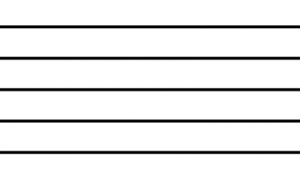
The staff consists of five equally spread out lines, which create four empty spaces. Pitch names are determined by the position of notes on the staff. Notes placed higher on the staff are higher in pitch than notes placed lower on the staff.
The G-Clef
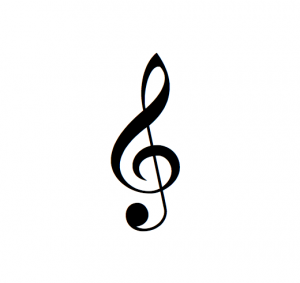
This symbol is called a G-clef. When it is placed on the staff in the manner of the example it is referred to as a treble clef. The treble clef is positioned at the beginning of each staff. Guitar music is written in treble clef, although it sounds an octave lower than written.
Notes
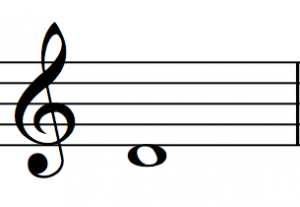
The Note ‘B’

The note ‘B’ is in on the middle line of the staff. Think of in-be-tween. It is played as the second string open.
The Note ‘D’
The note ‘D’ is directly below the staff. Think of ‘D’ for down because it is down below the first staff line. It is played as the fourth string open.
The Note ‘E’
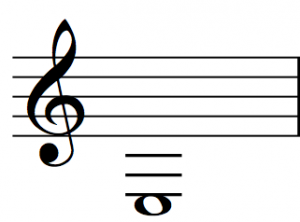
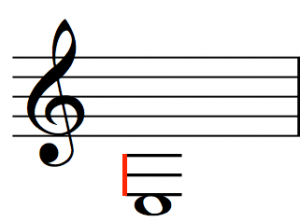
The note ‘E’ is below the third leger line. The extra lines below the staff are called leger lines. Notice that they are evenly spaced and are meant to be an extension of the staff. The note ‘E’ is played as the sixth string open. To remember the pitch ‘E’, imagine a vertical line placed to the left of the three leger lines. Notice how it makes an upper case letter ‘E’ (as shown below).
String Numbers
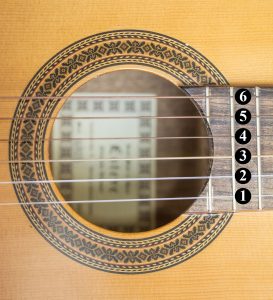
The strings on the guitar are numbered 1 through 6 from the floor upward. For example, the note ‘B’ is played as the second string open.
Rhythms
Whole Note
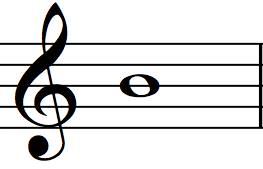
A whole note sustains for 4 beats. The whole note consists of an oval shape that is not colored in.
Whole Rest
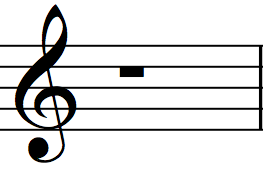
A whole rest creates silence for 4 beats. The whole note rest looks like a top hat placed upside down.
Half Note
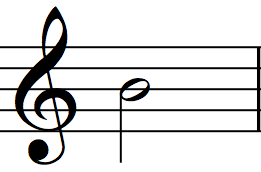
A half note sustains for 2 beats. The half note consists of an open note head and a stem.
Half Rest

A half rest creates silence for 2 beats. The half-note rest looks like a top hat right side up.
Quarter Note

A quarter note sustains for 1 beat. The quarter note consists of a note head that is filled in and a stem.
Quarter Rest
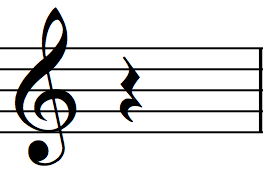
A quarter rest creates silence for 1 beat. The quarter note rest is a somewhat squiggly line.
Note: I have used the note ‘B’ in the pitched examples above for the whole, half and quarter notes. However, any pitch can have any rhythm. Pitches and rhythms are the main building blocks of standard music notation and are combined in countless ways. To be an excellent sight-reader, it is important to be quick at recognizing, processing and playing pitches and rhythms.
How to Count
Most songs have a steady beat. Composers typically clump the beats into groups of 2, 3 or 4, with an accent placed on the first beat of the group. The following symbols and concepts are essential to understanding rhythm in standard notation.
Bar Line and Measure
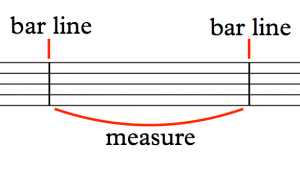
Bar lines divide the staff into measures. A measure is the space between two bar lines. Measures are important because they contain the groups of beats. If the song is grouped into four beats per measure, that means each measure must add up to four beats—no more, no less.
4/4 Time Signature
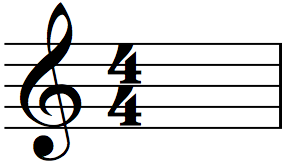
The time signature is placed at the beginning of a piece. It contains two numbers. The top number expresses how many beats are in a measure. The bottom number expresses what type of note value usually receives one beat. Think of the bottom number as a fraction with the number 1 on top. For example, in the case of the time signature to your left, 1/4 refers to a quarter note. Therefore, a 4/4 time signature = 4 x 1/4 notes per measure. Or, put another way, a 4/4 time signature contains four quarter notes per measure.
Double Bar Line
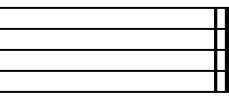
The double bar line marks the end of a musical section. Notice that both vertical lines are the same width.
Ending Bar Line

The ending bar line marks the end of an entire composition. Notice that the second line vertical line is thicker than the first.
Let’s Play |
Sight-Reading Tips
Knowledge of music notation is critical, but knowledge is not enough. Physical posture, mental attitude and good habits contribute to sight-reading successes as well. Throughout the series you will receive sight-reading tips, quotes, proverbs, poems and aphorisms to inspire keep going sight-reading.
Physical Posture
Make sure your guitar-playing posture maintains a relatively steady guitar. When your guitar is steady you don’t have to look at your hands very often. To be a good sight-reader your eyes need to be focused on the score, not on your hands. Also, make sure your guitar-playing posture doesn’t unnecessarily strain your muscles or joints. If you have trouble with posture, I suggest you work with a teacher and/or do more careful research on the topic before launching into this series.
Attitude
The most important attitude for sight-reading is what I call the keep going attitude. The keep going attitude is more concerned with keeping the pulse than perfecting pitches and rhythms. Remember, you are playing exercises. The exercises in this series are not precious. You are playing them for your personal growth, not for a performance. So, don’t worry if the music sounds messy or ugly! The only thing you must actively strive to do is to stay with the pulse.
Have fun! If you make a mistake, I suggest you laugh. Sight-reading does not have to be drudgery. Discovery, irony and even a bit of recklessness are the right attitudes for keep going sight-reading. My mentor, Theodore Norman, used to good-naturedly tease my bad sight-reading with ridiculous descriptions intended to lighten the mood, and it helped. He also advocated that guitarists respond to mistakes by nodding the head up and down, instead of left to right, to create a sense of confidence.
One way to make sight-reading more fun is to do it with another musician. I suggest you do this series with a friend. If that is not possible, treat yourself like a friend.
Good Habit: Count Each Beat Out Loud
Count the beats 1-2-3-4- out loud, regardless of what the music demands. In other words, count throughout the entire exercise, even when you have rests. Some students experience difficulty counting out loud and playing at the same time. If you find it difficult, don’t give up! You will be able to master this skill with a bit of practice. Once you have mastered counting out loud while sight-reading, you can easily count silently, in your head.
Checklist for Sight-Reading
- Count the beats out loud.
- Keep going (even if you make a mistake).
- Maintain your best playing posture.
- Look at the score, not your hands.
Let’s Play Rhythms |
It’s time to put this knowledge to practice. Every unit begins with a few play-along exercises that require you to sight-read a variety of rhythms while plucking only one pitch. Click on the blue phrase with the word Score to open the musical notation in another window. Then, click on the play button under Audio to start the play-along track. Wait for the count-in to start the song. Remember, it is critical that you keep up with the beats, even if you make a mistake. Don’t forget to count out loud.
Attitude Tip
In order to play well, you have to permit yourself to play badly. –Theodore Norman
Exercise 1.1: Score
Exercise 1.1: Audio
Exercise 1.2: Score
Exercise 1.2: Audio
Exercise 1.3: Score
Exercise 1.3: Audio
Let’s Play Duets |
At the end of every unit, we will play duets. The duets encourage you to keep up with the beat. In my experience, students who stop to fix mistakes in the middle of an exercise take a long time to learn to sight-read. However, students who keep going with the beat, especially when they make mistakes, learn to sight-read quickly.
Attitude Tip
Fall down seven times, get up eight times. –Japanese proverb
Duet Notation
Duet notation is different from solo notation. Duet notation includes a brace that joins two staves. The word staves (rhymes with caves) refers to more than one staff. When two ore more staves are joined by brace, the unit is called a system. The system indicates that the music on both staves are to be played at the same time and according to the same pulse.
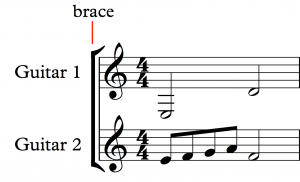
Notice the top staff is labeled Guitar 1 and the bottom staff is labeled Guitar 2. You, the student, will read from the Guitar 1 staff while I play from the Guitar 2 staff in the prerecorded, play-along tracks below. Throughout this series, you are only expected to play Guitar 1. The notation for Guitar 1 has been carefully designed to progressively build upon the concepts introduced in each unit.
Exercise 1.4: Score
Exercise 1.4: Audio
Exercise 1.5: Score
Exercise 1.5: Audio
Exercise 1.6: Score
Exercise 1.6: Audio
Exercise 1.7: Score
Exercise 1.7: Audio
Exercise 1.8: Score
Exercise 1.8: Audio
Congratulations!
You have completed this unit! If you kept up with the beat and accurately played approximately 70% of the pitches and rhythms, you are ready for the next unit. Feel free to repeat the exercises. However, do not play them so often that you memorize them. Once you memorize the notation, you are no longer developing the skill of sight-reading.
